
Tuesday, September 18, 2018
Wednesday, September 12, 2018
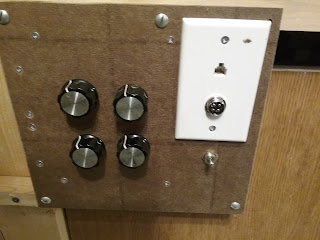
Main Control Panel
The main control panel wasn't labelled nor painted, so I decided to make a styrene face for it, which would be applied over top of the wood one. Using the wood panel as a template all the holes and cutouts were cut into the new styrene panel. It was then labelled where needed.


The 4 rotary switches select which 1 of 3 cabs power each of the 4 divisions. There is a plug in for 2 of the cabs. A DPDT switch selects where the turntable gets its power from, either the N. P. Or the port division.
Editors note. The third cab will be a power pack, mostly used for testing and troubleshooting. The numbers and letters are from a peel and stick lettering sheet from Walmart. There are 2 smaller panels. Panel 1 is at Grants Pass and also has 2 plug ins and a DPDT switch to select power from either N.P. or the main division. Panel 2 controls O'Brien in a like manner.
Monday, August 20, 2018
Lighthouse
I need a lighthouse for the port so I cut the bottom section off a chimney for the tower. Then a hole was cut into it for a window. A door was made up for the entrance. With 6 structural steel members, and a platform made using a hole saw, a skirt made from thin styrene, and a railing, the deck for the light was constructed. The bottom of a pill bottle add some needed height for the glass around the light (a bead container). Assorted parts including the cap from a kids squeeze from a tube dessert, a pull from a blind and some styrene made up the roof. With a light that's 24 parts in all.


 |
| Almost finished. |
Sunday, August 5, 2018
Funny thing happened on the way to the Bakery
Using some old castings a rocky out crop was fashioned on the curve into O'Brien. When using drywall compound to join all the castings together it dries unrealistically and shiny.

To fix this you have to let it dry a bit and then add in the rock strata, cracks and contours that follow the casting lines. I like to use a plastic palette knife and a stiff brush to work the compound as it dries. To speed up the drying I thought i would use a heat gun. All that did was create a crust but it did speed up the drying and when working it, the crust cracked and crumbled in a realistic way. After I finished the rocks to my liking, I looked over the area.

Oh No! The heat gun did more than dry the Plaster! It melted my guard rail wires and a Bakery delivery van, mostly the wheels. Hmm, I do have a town truck. Well let's make a accident scene. You can see how I have started to stage the scene in the picture below, broken wires, bent wheels and all.

Thursday, July 26, 2018
O'Brien's background.
Painted areas of the background that no longer matched the new rock face. The rock face was repainted and some ground foam was added. Below are before and after pictures. First before, second background painted and some ground foam, last a lot of trees added.


Monday, July 23, 2018
Painting rock walls
The rock cliff below Waldo needed to be painted, see June 27 post. With some craft paint, medium grey, raw sienna, golden brown, tan and burnt sienna I painted all the white areas with mixtures of the above colours. Then dry brushed mixtures of mainly golden brown, burnt sienna and raw sienna, over all of the rocks on the cliff. I also use this technique on the rocks by the coal triple. Both areas were then sprayed with a dilute black paint to highlight the shadows.
 |
| Cliff's of Waldo |
 |
| Coal triple area. |
Saturday, July 21, 2018
Pelican Bay fences.
Added guard fencing in the town of Pelican Bay. I chose to use all the same type of fences in this area to maintain the look of continuity. These fences will all be painted a weathered grey although I may have someone painting the fence at the restaurant white, maybe Tom Sawyer can help.


Thursday, July 19, 2018
Ferry dock.
The dock where the ferry will tie up was too high so a new one had to be added. Luckily I had 1 saved from the old port that would do the trick. Cutting it into 2 sections to make it fit around the the higher dock, and adding a sloping path to the parking lot was all that was needed. Well not quite, some rock blasting was needed to shove the building back from the edge of the Peninsula to make room for the leg of the new, lower dock. I think multiple deck levels adds interest to the scene. The lower dock will be attached to the upper dock as I want to be able to pick up the entire unit to clean the water surface below the docks (as are all of the docks and piers over the water). Now I need a name for the building, Pelican Bay Ferry Co. perhaps.


Paving crews.
The Paving crews have been busy paving in O'Brien and Pelican Bay.
After the crossing planks were installed and covered with masking tape the road was plastered in. When it was dry the roads were painted a medium grey. A lighter grey was washed in while the medium grey was still wet, giving the roads are weathered look. Cracks and patches will be added at a later date.


After the crossing planks were installed and covered with masking tape the road was plastered in. When it was dry the roads were painted a medium grey. A lighter grey was washed in while the medium grey was still wet, giving the roads are weathered look. Cracks and patches will be added at a later date.


Friday, July 13, 2018
The port
The port area is built on a rugged coast line and should look the part. The first thing to tackle is the plastic edges of the turntable. Using shaved down ceiling tiles these edges were covered. The station area was elevated and the road to the ferry was graded into different levels. Areas around the passing tracks were also elevated. A rocky wall around the ferry terminal parking lot was plastered in. Without colour on the plaster some of the features are hard to see in the picture.


Monday, July 9, 2018
Electrical Changes
Making the mainline 1 big loop required some wiring changes. The leads from the rotary switch powering the line from the port to OBrien had to be swapped green for orange. This made the positive and negative tracks the same from the port to Grants Pass. O'Brien is still powered by a DPDT switch but the power leads to the coal mine had to be unhooked from that block.The port was gapped making it electrically separate from the rest of the railroad. The black and red feeders from Waldo were joined to the blue and white feeders of the mainline, at the terminal at the end of the port. The old Waldo rotary switch was used to power the green and orange feeders powering the track now designated as the Northern Pacific. These feeder wires were also reversed at the terminal to keep the correct rail positive. At Grants Pass the blue and white feeders, from the DPDT switch, had to be swapped blue for white, at the terminal there. The turntable at the port was also powered. This divides the layout into 4 blocks. The port, the port to O'Brien, O'Brien to Grants Pass, including the Waldo branch, and the N.P. connector. Power to Grants Pass and O'Brien is selected by throwing a DPDT switch to 1 of the 2 connecting tracks power. However the DPDT switch powering Grants Pass when thrown from N.P. to the mainline or vice-versa will also change the engines direction, as this is the 2 tails of a loop, joining in Grants Pass although it is not meant to run as a loop. This is caused because of the need for a crossover near the ports turntable that joins the N.P. Track to the port track.
This post is mainly for my reference.
This post is mainly for my reference.
Friday, July 6, 2018
Trappers Gulch
Started mudding in the area of Trappers Gulch and put in the upper mainline trestle. The trestle needs a couple braces replaced. The lower trestle needs the bents installed. After the background is repainted, scenic materials will be added.


Thursday, June 28, 2018
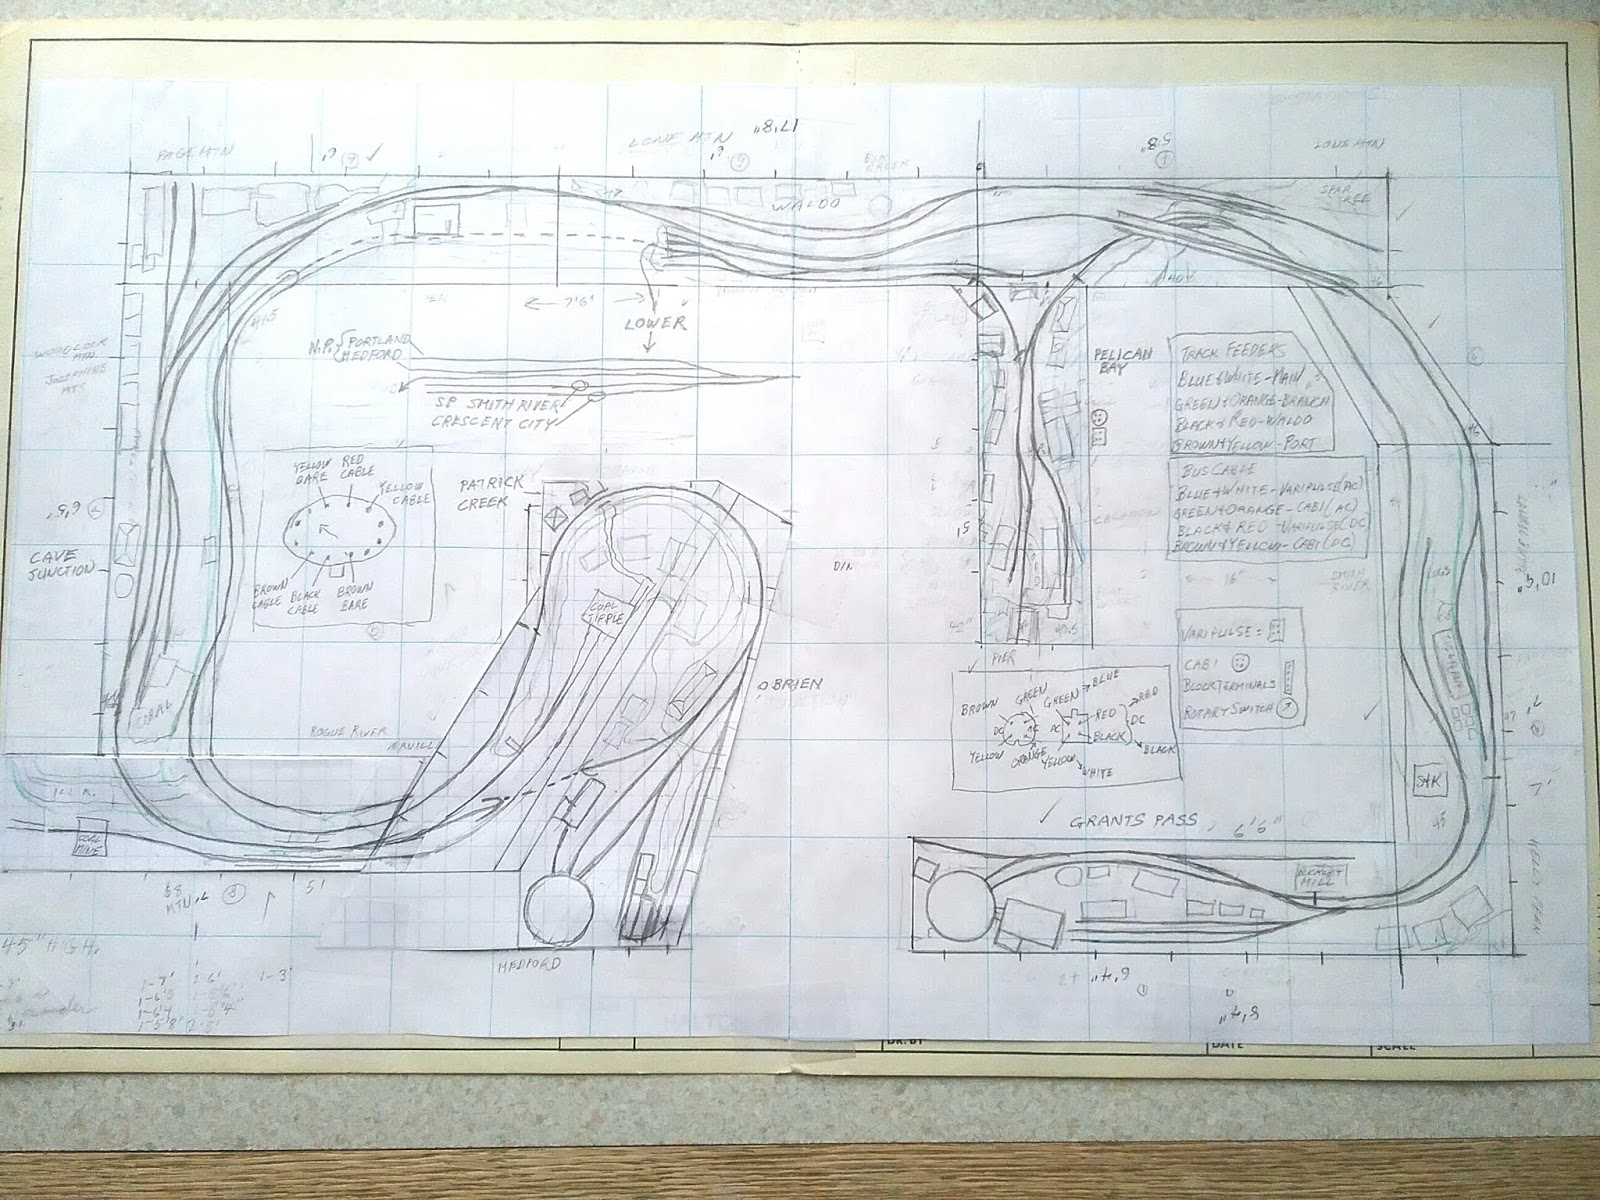
Layout plan

The blue track from Grants Pass is the connection to the NP. At Medford (staging) dashed lines, electrically isolated. Orange tracks are in the port, electrically isolated. Red tracks are the Waldo logging branch, electrically isolated. The towns of Grants Pass and O'Brien are also electrically isolated and use a BPBT switch to select power from the appropriate direction of travel. Because of the gaps at O'Brien, the mainline is divided into 2 sections. All of the gaps are for block control operation.
Wednesday, June 27, 2018
Hole in the wall, AKA O'BRIEN
Now that the upper mainline loops around and joins the lower loop, there is no need for a yard or turntable in O' Brien. The yard was made into a passing track and the Barrel Factory replaced the turntable. The village was also extended back into the corner.


Wait, now that I have a spare turntable, why not remove the wye in Pelican Bay and replace it with the turntable? With the route from Pelican Bay now turning to the left off the Peninsula, the right leg of the wye can be removed, providing the space for the turntable.

On the lower level, the right track comes off the Peninsula, and has a turnout running back to the turntable. It heads, off the bottom of the picture to O'BRIEN. There is a cross over on the line from Grants Pass so engines can use the turntable as a run around while moving cars in and out of staging. You may also see that there are 2 tracks coming from Pelican Bay. With the removal of the wye there was room to lengthen the passing tracks.
Sunday, June 24, 2018
Track plan changes.
Saturday, May 19, 2018
It's Alive!
Got my throttle back, he found a loose wire and fixed it. Got it home and no power. It was mentioned that the cable was not in good shape, so I got out my meter and found the green AC-DC feeder had no power, no noticeable problems. Replaced the cable and it works like a charm. Now all my hand held throttles work. Now I have to label all my control panels.
Saturday, May 5, 2018
No power?
After hooking up the last bit of wiring (to the turntable in Grants Pass) my Varipulse throtles would not work. Then I tried another throttle and Nothing! Well both throttles can't go bad at the same time, can they? So it must be my wiring. Reviewing my wiring plan I could not find a problem, but that doesn't mean that the wire gremlins can't. I did use different colours and wire type to keep everything straight. Next, I unhooked the last bit of wiring (all on a terminal, thank goodness) still no go. Next I tried a different areas to rule out a short in the Grants Pass area, Nothing! Next to eliminate any shorts or Transformer problem I set up a test track powered by a different throttle, still Nothing! Both throttles can't go bad at the same time, can they? I got out another 1, and to my surprise it works. Opened up the Varipulse, everything looks good, the other throttle had a broken wire. So I guess I dropped the Varipulse 1 too many times. A friend of mine is going to check it out. On the positive side (pardon the pun) my wiring is good to go.
Trail into the woods.
I may have bitten off more than I can chew. Now I have to paint a horse trail into the woods on the backdrop, that's hard to reach.
 I think it will turn off to the right or left rather quickly.

Saturday, April 21, 2018
The Coal Mine Area
The 3 level area around the coal mine has a large rock face made up of many separate castings which were joined with lots of Drywall compound. Once it was painted with just a base coat it looked quite good.


Thursday, April 19, 2018
Great Wall of Waldo
Not sure if that will be the name of this town or not, but this area has the greatest height difference between the two levels and is also narrow. This requires a lot of rock to build a cliff this long.


The bottom picture is the entrance to the staging area.


The bottom picture is the entrance to the staging area.
Tracks into Grants Pass
There is grade difference between the branchline and the mainline tracks coming up to Grants Pass. At this area the height difference is small so it was simply plastered in. While the plaster was wet it was brushed with an old paint brush.


Tuesday, April 17, 2018
Work on the port area.
The land forms supporting the original port buildings were worked on. Most of the original buildings were at different elevations in the original port so their base heights versus their dock heights had to be accommodated by either raising or lowering the area they sit on. I also like to keep any dock that has water under it, removable to be able to keep the water surface clean. At the same time any holes where the water will be were filled. After the plaster dried a base coat of water colour was applied using dark blue and green paint. Rock castings were installed in areas between docks and sea walls. The areas under docks received a coat of plaster which was bushed horizontally to simulate rock lines. After the plaster dries it will be painted 50 shades of gray.
 |
| This is the area were the Boat repair building will sit. |
 |
| Two buildings needed bases at different elevations. |
 |
| Water painted in. |
Monday, April 16, 2018
What a perfect place for a stream.
As I was wiring in the feeder wires my eyes wandered to the backdrop behind the proposed farm area. The valley seemed to me to run right into a slot in the rock formation. With a little rework to the rocks, channel the stream, it will cascade to the valley floor and run through the farm to the edge of the layout.
 The stream was drawn in and then moved to the right. This will add to foreground scenery. The house and barn areas will have another layer of ceiling put under them to create a slot for the stream to run. Nearer the track the stream will be cut into the existing tile an run under the track through a culvert or stone bridge down the level of the branch line.


 |
| Some rock castings were added at the waterfalls to create a chanel to direct the stream. |

Two layers of ceiling tiles were added to either side of the stream with a channel cut into the tile under the road bridge and railroad. The stream will continue out and under the branch line.
Sunday, April 15, 2018
Cab plug ins


 |
| Rasp |
Friday, April 13, 2018
Control panels for DC block control.
My layout is DC block control. The way I set the system up required 3 panels. At Crescent City and Grants Pass, the 2 ends of the layout needed a plug in for each cab and a DPDT switch to select either branch line or main line power. The main control panel is located near the port which is the center of the layout. It has a plug in for each of the 2 cabs (I may also tie in a stationary Tech I I throttle) and 4 rotary switches to select which cab powers which section of the layout, which are the mainline, the branchline, the port and the logging spur. A DPDT switch controls the power to 1 leg of the wye. It selects power from either the Port or the branchline which requires the engine to stop on that leg of the wye as the switch is thrown, reversing the polarity to the engine. The plug ins are spaced so that the hand held cabs can reach all areas of the layout easily. The 3 panels are pictured below. The top 1 is the main control panel, the next 1 is at Grants Pass and the last is at Crescent City.
See Control Panel post March 10, 2018


See Control Panel post March 10, 2018


Wednesday, April 11, 2018
Another river runs through it.
Well I have this road bridge I want to include on my layout but no place to put it. So cut in a river, add 2 railroad bridges, raise the surrounding terrain and add the bridge, easy. Roughed in river shown below. The background will be touched up to match the foreground.


Monday, April 9, 2018
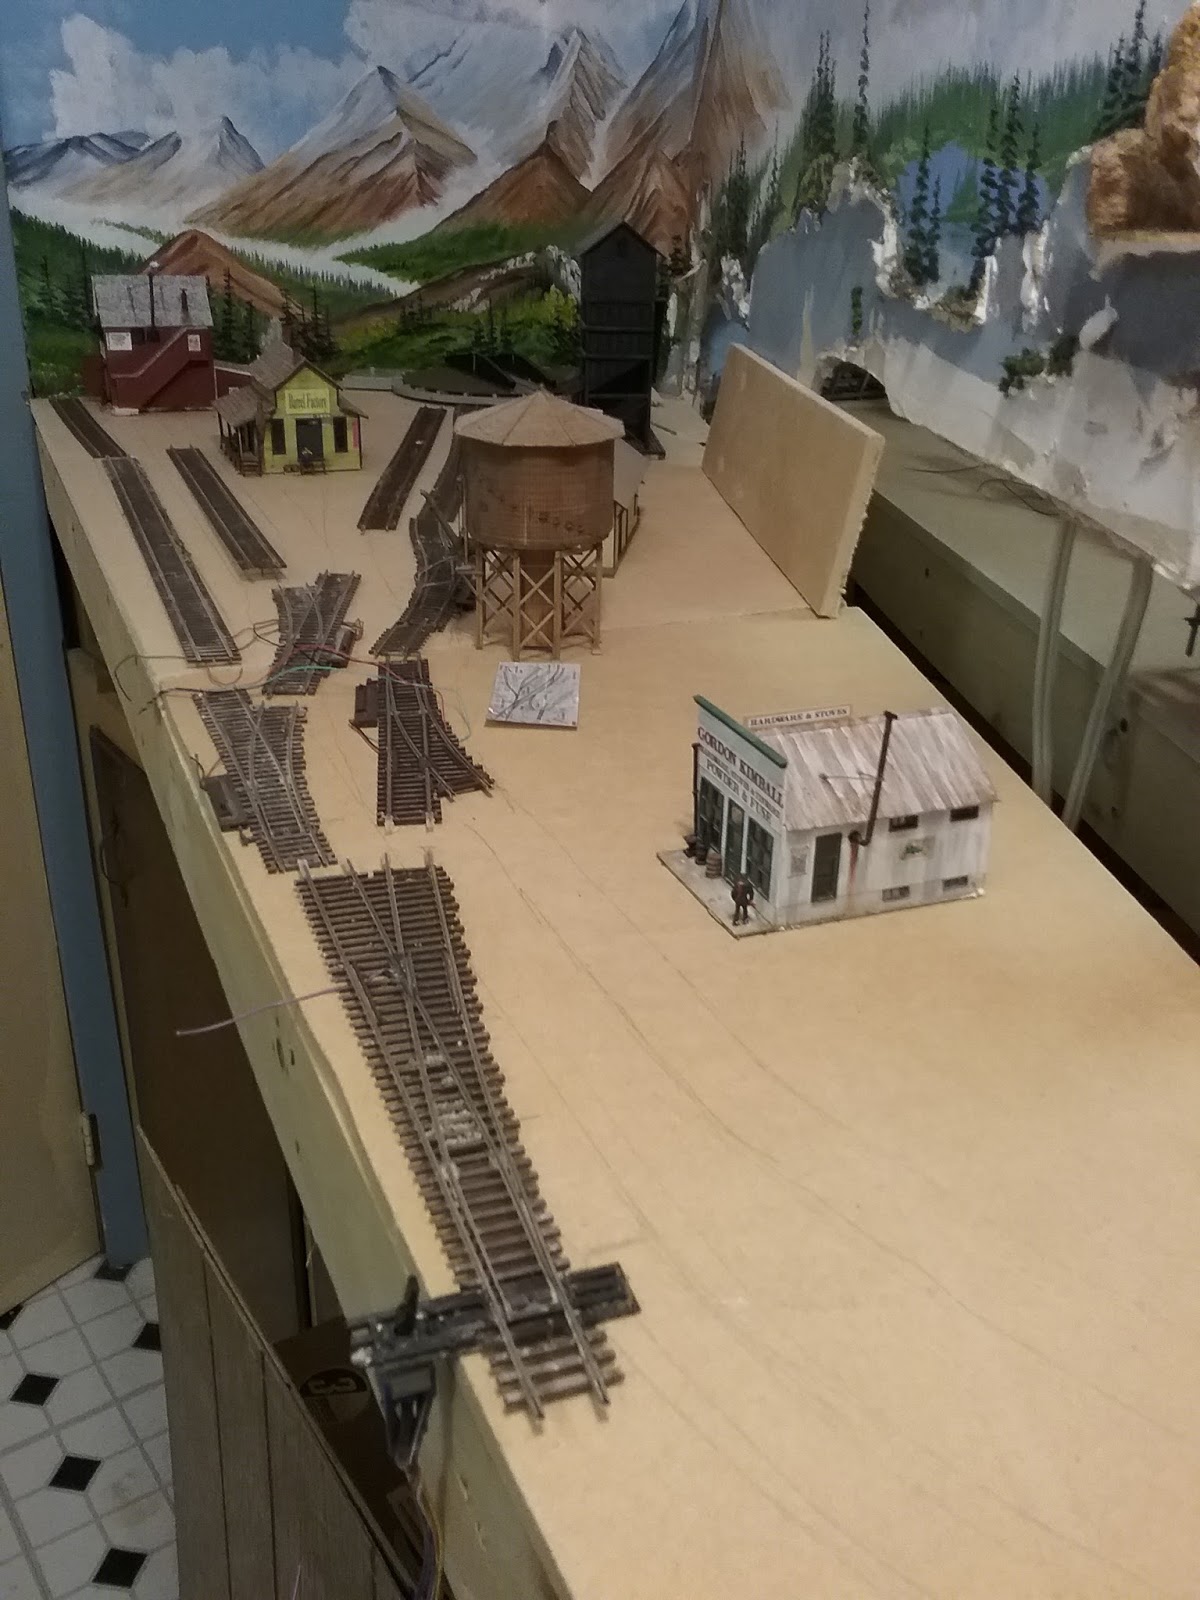
The logging camp takes shape.
The Lumber camp being located in a back corner of the layout will be built on a platform and then installed. All of the structures were arranged first and then the spar tree was put in place. A few minor moves and it all seemed to fall into place. Because a water tank was located on the hill, the bath house/latrine was move right below it. One of the bunk houses was elevated for a better visual effect. There's very little flat ground in nature so the more levels the better. Piping from the tank to the bath house, boardwalks, stumps, people and other details will complete the scene. When this diorama is finished and installed the background will be touched up to match the new scenery. The foreground river and scenery will be added and the trestle will be built and installed. Only then can the main and branch lines be added in front of this scene.
 |
| Horses deliver the logs to the spar tree. |
 |
| The bath house repositioned under the water tank. |
 |
| Overview of the camp. |
Thursday, March 29, 2018
Mountain building around Grants Pass.
With the new bench work completed and the basic trackwork laid, the background mountains were the next to be tackled. Old castings were fit into place and joint compound was used to fill in the gaps. While doing this, the castings fault lines and shapes were continued into the new plaster. When the plaster was almost dry a course paint brush was used to add more texture and rock stratification. A small stream was cut into the roadbed by the coal tipple and the roadbed for the narrow gauge track to the coal mine was worked on. The deep shaft coal mine will be reworked from the old stamping plant.


 |
| The old stamping plant will be reworked into a coal mine. |
Wednesday, March 21, 2018
Hole in the wall.
What a great name for a town. However it will be the town of Grants Pass that will rise from the rubble of Cave Junction. More on the track plan latter. The narrowness of this area required a near vertical wall of rock. This towering cliff was erected from old castings arranged in 3 stacked rows and is only about 4 inches deep. The old background will be updated to match the new mountain ridges. The only part of the town to be depicted will be the railroad yard and 2 factories as is the case in most model railroads. Although there will be a few commercial buildings included.


Subscribe to:
Posts (Atom)